
Creating privacy in a backyard doesn’t require a massive budget or professional contractors. Many homeowners overlook affordable solutions that deliver effective screening while enhancing curb appeal and usability. From living barriers to salvaged materials, the right combination of plants, structures, and fabrics can transform an exposed yard into a secluded retreat. This guide covers practical, cost-effective methods that deliver real privacy without draining savings accounts, projects most DIYers can tackle over a weekend with basic tools and materials.
Key Takeaways
- Inexpensive backyard privacy ideas include fast-growing hedges like Arborvitae and Privet that establish full screening within 3-4 seasons when planted from smaller, budget-friendly nursery stock.
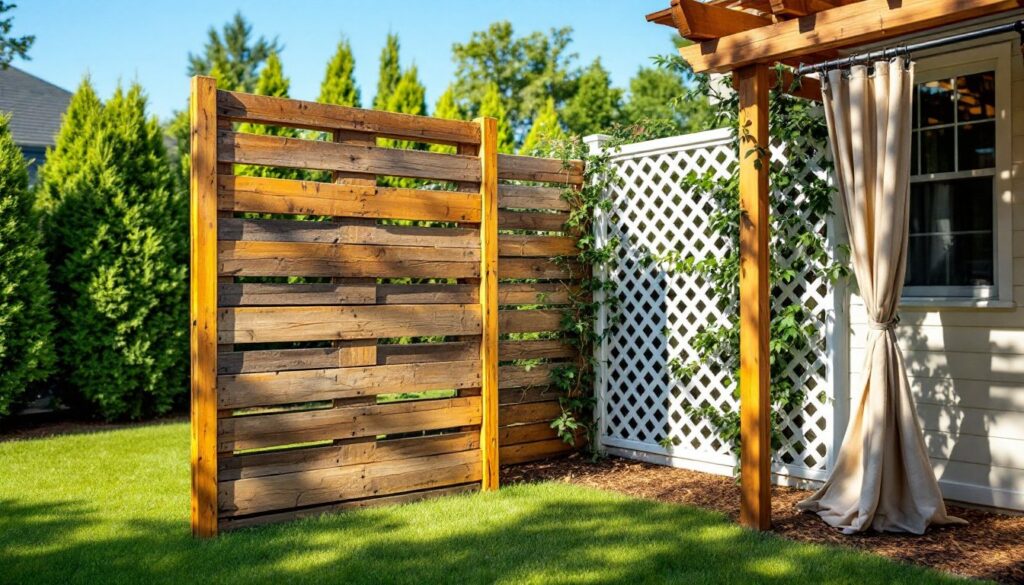
- Pallet walls and recycled wood panels offer DIY fence alternatives costing under $120 per 8-foot section, making them ideal for renters and homeowners avoiding costly professional contractors.
- Living screens with climbing plants on lattice or cable systems deliver layered privacy while reducing noise and adding seasonal interest at minimal material costs.
- Outdoor curtain fabrics rated for UV resistance provide instant, adjustable privacy for patios and decks, with DIY setups costing $60-80 compared to $200-400 for retail custom drapes.
- Combining three or more privacy elements at different heights—fast-growing plants, structural screens, and fabric panels—creates effective seclusion without a fortress-like appearance or excessive budget impact.
- Most freestanding privacy screens under 6 feet tall avoid permitting requirements, making quick weekend DIY projects feasible for homeowners with basic tools and minimal construction experience.
Natural Privacy Solutions Using Plants and Greenery
Living privacy screens offer the dual benefit of seclusion and softened aesthetics. Unlike hard structures, plants add oxygen, filter noise, and change with seasons. They’re often the most cost-effective long-term investment for yard privacy, especially when started from smaller nursery stock.
Fast-Growing Hedges and Shrubs
Arborvitae (Thuja) varieties like ‘Green Giant’ and ‘Emerald Green’ remain the workhorses of privacy hedging. They grow 3-5 feet per year in USDA zones 5-8, reaching mature heights of 12-20 feet depending on variety. Plant them 3-4 feet on center for a dense screen within 3-4 seasons. Purchase 3-gallon or 5-gallon containers rather than larger specimens, the cost difference is substantial, and younger plants establish faster.
Privet (Ligustrum) tolerates poor soil and urban conditions better than most alternatives. It grows 2-3 feet annually and responds well to aggressive pruning, making it ideal for maintaining specific heights. Expect to trim 2-3 times per growing season to keep it tight and formal.
Leyland Cypress delivers fast growth (up to 4 feet yearly) but requires attention to spacing and irrigation. Plant them 6-8 feet apart minimum, overcrowding invites disease and dieback in humid climates. They’re not the best choice for tight urban lots or areas with heavy clay.
For partial privacy with lower maintenance, Viburnum species like ‘Brandywine’ or ‘Chindo’ provide year-round interest without constant shearing. They mature at 8-12 feet and offer spring flowers and fall color.
Planting tips: Amend native soil with compost at a 1:1 ratio only if dealing with heavy clay or pure sand. Dig holes twice as wide as the root ball but no deeper, planting too low kills more shrubs than drought. Mulch with 2-3 inches of shredded hardwood, keeping it 4 inches away from trunks to prevent rot.
Bamboo and Ornamental Grasses
Clumping bamboo varieties, not running types, offer rapid privacy without the nightmare of invasive spread. Fargesia species like ‘Rufa’ or ‘Scabrida’ grow in tight clumps, reaching 8-15 feet depending on cultivar and climate. They tolerate USDA zones 5-9 and thrive in partial shade, making them useful for north-facing fence lines.
Running bamboo (Phyllostachys) can work if contained with HDPE root barrier installed to a depth of 30 inches minimum, but it’s not a beginner-friendly option. The barrier must form a complete loop with overlapped seams, or runners will escape.
Ornamental grasses like Miscanthus (‘Gracillimus’ or ‘Morning Light’) provide seasonal screening at 5-7 feet tall. They’re best used as accent layers behind shorter evergreens or along fence lines where winter dieback isn’t an issue. Plant them 3 feet on center for a full hedge effect by the second season.
Pampas grass (Cortaderia) hits 8-10 feet and tolerates drought once established, but sharp leaf edges require gloves during maintenance. Cut the entire clump back to 12 inches in late winter before new growth begins, use loppers or a hedge trimmer, not a string trimmer.
All grasses perform best with full sun (6+ hours) and well-draining soil. They’re low-input once established but need consistent water the first season.
DIY Fence and Screen Alternatives
For those needing instant privacy or working with rental properties, temporary or semi-permanent structures provide flexibility without the permitting and cost of traditional fencing. These outdoor privacy solutions range from salvaged materials to modular systems that install in hours.
Pallet Walls and Recycled Wood Panels
Heat-treated pallets (marked HT, not MB which indicates methyl bromide treatment) are widely available free or under $10 from warehouses, feed stores, and Craigslist. Standard pallet dimensions are 48″ x 40″, but quality varies wildly. Look for hardwood pallets with tight board spacing and minimal damage.
To build a freestanding pallet screen:
- Anchor posts using 4×4 pressure-treated lumber set in concrete footings or driven 24 inches deep with a post driver. Space posts 8 feet on center to match two pallet widths.
- Attach pallets horizontally with 3-inch exterior-grade screws or lag bolts through the stringers (the thick support boards running perpendicular to deck boards). Pre-drill to prevent splitting.
- Backfill gaps by removing deck boards from damaged pallets and screwing them over openings. Alternate board direction for visual interest.
- Finish with exterior stain or paint. Sand rough edges first, especially if kids or pets will be nearby. A pump sprayer makes quick work of staining, figure 200-300 square feet per gallon of solid stain.
For a more refined look, tongue-and-groove cedar fencing boards installed vertically on a simple 2×4 frame deliver a modern aesthetic. Buy #2 grade cedar boards (actual dimensions 5.5″ wide) for 30-40% savings over clear grade with minimal visual difference once stained. A 6-foot-tall by 8-foot-wide panel uses roughly 18 boards plus framing lumber, costing $80-120 depending on region and market.
Corrugated metal panels (26-gauge steel or aluminum) create industrial-style screens that pair well with contemporary landscapes. Standard 3-foot-wide panels run $15-25 each at farm supply stores. Frame them with 1×3 cedar or composite trim to hide raw edges and screw heads. Wear gloves and safety glasses, cut edges are razor-sharp. A circular saw with a metal-cutting blade or tin snips handles cuts, though a miter saw with a metal blade gives cleaner results.
These projects work well when combined with budget-conscious yard upgrades that layer multiple privacy elements.
Lattice Screens and Trellis Systems
Vinyl or wood lattice panels offer immediate semi-privacy and a framework for climbing plants. Standard 4×8-foot sheets of vinyl lattice cost $30-50 and require zero maintenance. Wood lattice runs $20-35 but needs annual sealing or painting.
Installation is straightforward:
- Set 4×4 posts as described above, ensuring they’re plumb. Use a post level, the kind that straps onto the post with adjustable vials, for accuracy.
- Build a frame from 2×2 or 2×3 lumber that fits between posts, creating a border for the lattice. This prevents sagging and hides cut edges.
- Secure lattice with 1-inch staples or pan-head screws every 12 inches around the perimeter. Don’t overdrive fasteners, lattice cracks easily.
- Cap the frame with 1×4 trim boards for a finished look and added structural support.
For a living screen, plant clematis, climbing roses, or trumpet vine at the base. These vigorous climbers will cover a full panel in 1-2 seasons with basic support. Install galvanized wire or jute twine horizontally every 18 inches to guide growth until vines attach on their own.
Cable and wire systems provide minimalist support for vines with nearly invisible hardware. Run 1/8-inch stainless steel cable horizontally between posts using turnbuckles to maintain tension. Space cables 12-18 inches apart vertically. This approach works beautifully for modern outdoor transformations where clean lines matter.
Most municipalities don’t require permits for freestanding screens under 6 feet tall that aren’t attached to structures, but always verify local codes before starting. Setback requirements from property lines vary, typically 6 inches to 3 feet.
Outdoor Curtains and Fabric Solutions
Fabric screens deliver instant, adjustable privacy at a fraction of hard-structure costs. They’re particularly effective for patios, decks, and pergolas where permanent barriers aren’t desirable or allowed. The key is choosing materials and hardware rated for exterior exposure.
Outdoor curtain fabrics must resist UV degradation, mildew, and moisture. Look for solution-dyed acrylic (like Sunbrella) or polyester blends labeled for outdoor use. These fabrics maintain color and structure for 3-5 years of continuous sun exposure. Budget options include canvas drop cloths, the 9×12-foot heavyweight variety runs $15-25 and can be hemmed and grommeted for a custom look.
Installation methods:
Galvanized steel pipe makes a sturdy, industrial-style curtain rod. Use 3/4-inch or 1-inch diameter pipe cut to length at any hardware store (free cuts with purchase). Mount with floor flanges screwed into posts or fascia. This system easily supports heavy fabrics and high winds.
Stainless steel cable with ring clips offers adjustability. String 3/16-inch cable through eye bolts installed in posts or overhead beams, tension with turnbuckles, then hang curtains from clip rings spaced every 6 inches. This allows panels to slide open and closed.
Tension rods work for smaller spans (under 6 feet) between posts. Commercial-grade versions with spring-loaded mechanisms hold better than residential curtain rods.
For those exploring various creative screening techniques, fabric panels paired with planted elements create layered privacy.
Grommeting panels: Rent a grommet press kit from tool libraries or buy a basic set for $25-40 if hemming multiple panels. Space 2-inch grommets every 8-10 inches along the top hem. Reinforce corners with double-folded fabric, this prevents tearing in wind.
Tie-top or tab-top panels avoid grommets entirely. Cut fabric strips, fold, and sew them along the top edge to create loops that slip over rods. This method suits lightweight fabrics better than heavy canvas.
Weatherproofing: Even outdoor-rated fabrics benefit from fabric waterproofing spray reapplied annually. Spray when fully dry, following can directions for coverage, typically 50-75 square feet per can.
Maintenance: Hose down panels monthly during pollen season. Most outdoor fabrics tolerate machine washing on gentle cycle with mild detergent, air dry only, never use heat. Remove and store during winter in humid climates to extend lifespan.
Wind resistance: In exposed locations, use bungee cords or Velcro straps at the bottom corners to secure panels to deck rails or ground stakes. Unsecured fabric acts like a sail, generating surprising force. For permanent installations in windy areas, consider these practical approaches that combine multiple anchoring methods.
Color and opacity: Darker colors provide better privacy and UV blocking but fade faster than neutrals. White and beige last longest but show dirt. For maximum privacy, choose tightly woven fabrics, hold samples to light to check opacity. Sheer fabrics work for wind breaks and partial screening but won’t block sightlines.
Cost comparison: A DIY curtain screen for a 12-foot pergola opening using drop cloths, pipe, and flanges costs approximately $60-80 in materials. The same coverage with custom outdoor drapes runs $200-400 retail.
Fabric solutions pair particularly well with strategic layout planning that positions seating areas for optimal privacy. They’re also ideal for renters or anyone wanting seasonal flexibility, installation requires no permanent modifications and breaks down in under an hour.
When combining multiple privacy strategies, consider sight lines from neighboring windows and common vantage points. Layer solutions at different heights and distances, a well-executed outdoor space often uses three or more privacy elements working together. Mix fast-growing plants near property lines, mid-range structural screens around activity zones, and portable fabric panels for adjustable coverage. The result feels deliberate rather than fortress-like, creating genuine seclusion without sacrificing aesthetics or breaking budgets.