
A large <a href="https://i-zaitaku.com/backyard-makeovers-trends-2026/”>backyard offers more than just grass to mow, it’s space to stretch out, build projects, and create distinct outdoor rooms. The challenge? Most sprawling yards end up underused because homeowners aren’t sure where to start. Breaking a big lot into defined zones, adding hardscaping, and planning for year-round use turns empty acreage into functional living space. This guide covers practical ideas for transforming a large backyard, from building structures and pathways to installing features that boost property value and make the yard actually worth maintaining.
Key Takeaways
- Large backyard ideas thrive when space is divided into defined zones—seating, dining, play, and garden—each with specific sun exposure and clearance requirements to maximize functionality.
- A multi-functional entertainment area requires a level concrete pad (at least 12×16 feet), built-in appliances, pergola shade, and early wiring for electrical outlets and lighting to extend year-round usability.
- Water features like ponds, pools, and pondless waterfalls add property value and visual interest; choose based on maintenance level and budget, from DIY weekend projects to professional installations.
- Raised garden beds built from untreated lumber or steel improve drainage and plant health; fill with equal parts topsoil, compost, and peat moss, then mulch with 2–3 inches of bark to retain moisture.
- Shade structures—pergolas, pavilions, retractable awnings, and sail shades—protect furniture and extend outdoor living time; most structures over 8 feet or attached to the house require permits and footings below the frost line.
- Start with one project and expand gradually; pathways, hardscaping, and firepit lounges transform large backyards into intentional outdoor rooms that feel less overwhelming and more usable.
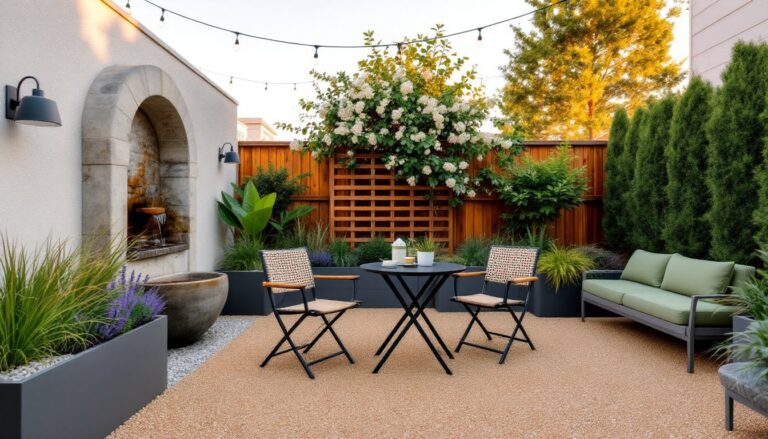
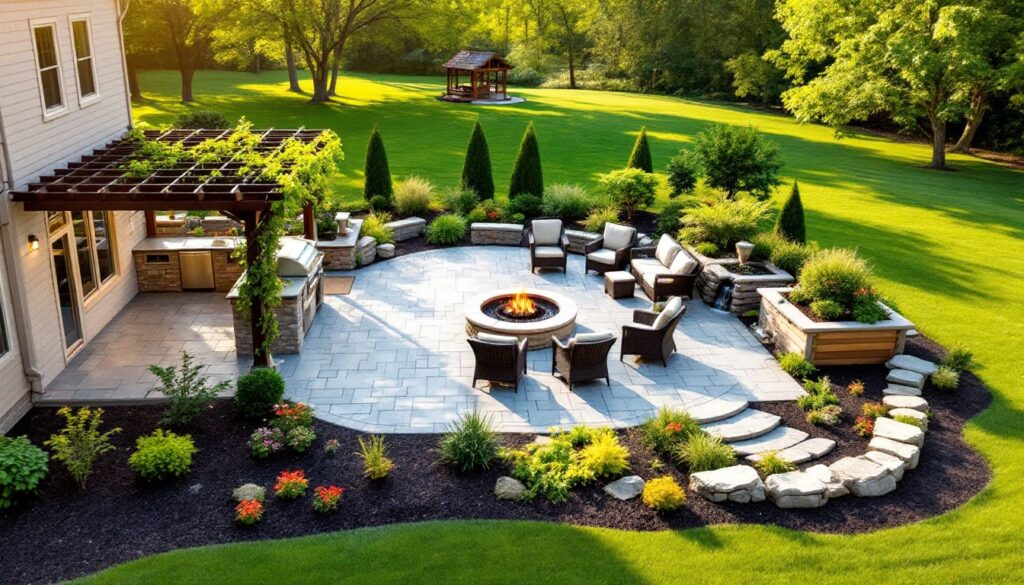
Create Defined Outdoor Living Zones
Large yards feel aimless without structure. Dividing the space into zones, dining, lounging, play, garden, gives each area purpose and makes the yard easier to navigate.
Start by sketching a rough plan on graph paper, marking existing features like trees, slopes, and utilities. Locate zones based on sun exposure: place seating areas in shade, vegetable beds in full sun, and play spaces where parents can see them from the house.
Use physical boundaries to separate zones without fencing everything off. Low hedges (18–24 inches tall), stone borders, or 4×4 timber edging work well. For flexible division, try outdoor rugs under furniture groupings or gravel paths to mark transitions.
A firepit lounge needs at least 12×12 feet of clearance for seating and safe ember control. Dining areas should allow 10 feet total: 3 feet per side of the table for chairs, plus walking room.
Consider microclimates. A sunken patio stays cooler in summer. A southern-facing corner with a privacy wall creates a warm pocket for early spring use. Many homeowners incorporate backyard transformation strategies when mapping out zones to maximize usability across seasons.
Don’t over-build. Leaving open lawn between zones gives kids and pets room to move and prevents the yard from feeling cluttered.
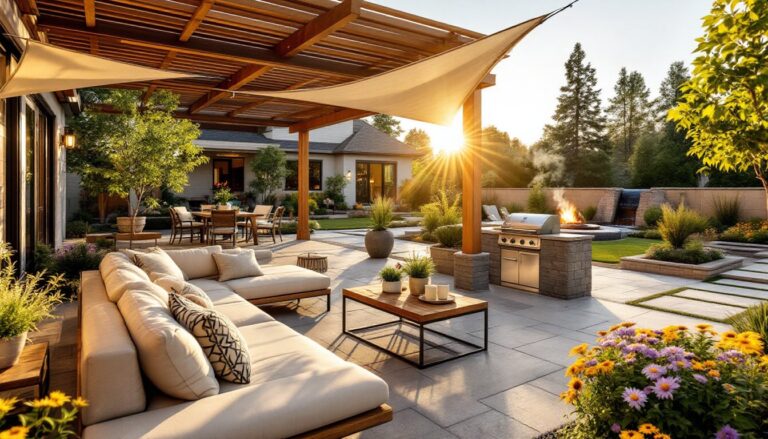
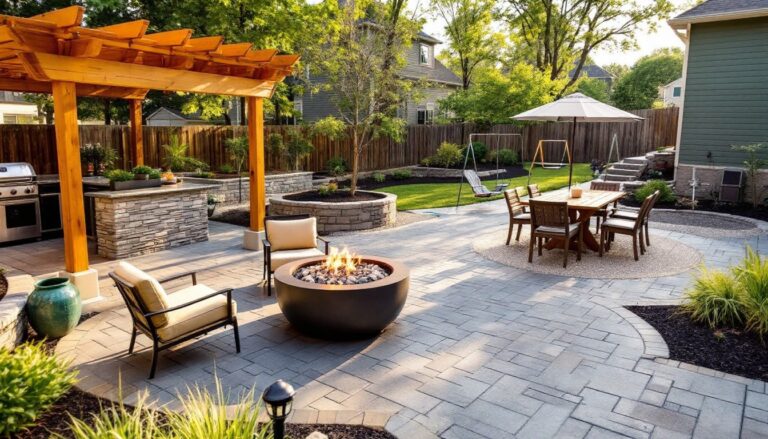
Design a Multi-Functional Entertainment Area
An entertainment zone anchors outdoor gatherings and gets year-round use if planned right. This means more than dropping a grill on a patio slab.
Start with a level base. Pour a concrete pad at least 12×16 feet for a full outdoor kitchen setup, or go with 12×12 feet for a simpler grill station and prep counter. Use 3,000 PSI concrete with 6×6-inch wire mesh for reinforcement. Let it cure for seven days before building on it.
For the cooking zone, include a built-in grill, side burner, and 36-inch minimum counter space for plating. Frame with metal studs or concrete block, then veneer with stone or stacked brick. Run a dedicated 20-amp GFCI circuit for small appliances: gas lines require a licensed plumber and inspection.
Add a pergola or pavilion for shade. A 12×14-foot pergola built with 2×8 or 2×10 rafters on 4×4 posts set 3 feet deep in concrete provides coverage without blocking too much sky. Space rafters 16 inches on center for partial shade, closer for more coverage.
Include seating for your typical crowd plus two. Built-in benches with storage underneath save space. For flexible layouts, use movable chairs that stack or nest.
Wire for sound and lighting early. Bury UF-rated cable in 18-inch trenches (check local code) for outlets, and install weatherproof speakers on the pergola beams. A dimmer-controlled LED strip along counters or under cap rails extends usability after dark.
Add a Water Feature or Pool
Water features range from simple DIY projects to major construction. Match the feature to your time, budget, and yard usage.
Ponds and waterfalls can be built over a weekend with a preformed liner or flexible EPDM liner (45-mil thickness minimum). Dig the basin 18–24 inches deep for plants, deeper if stocking fish. Edge with flat stones and use a 200–500 GPH submersible pump to circulate water and prevent stagnation. Place the feature where you’ll see it, near a patio or window, not hidden in a back corner.
In-ground pools require permits, excavation, and professional help unless you’re experienced with concrete or fiberglass work. Standard rectangular pools start around 12×24 feet: kidneys and freeforms take more space. Budget for fencing (4-foot minimum height in most jurisdictions, with self-closing gates), plus decking and equipment pads.
Above-ground pools are faster to install and don’t usually need permits, but site prep still matters. Level the ground within 1 inch across the diameter, then lay 2–4 inches of sand for the liner. Frame kits handle the structure, but plan for a surrounding deck unless you enjoy climbing a ladder every swim.
For low-maintenance water, try a pondless waterfall: water flows over rocks into a buried reservoir with a pump, so there’s no standing water to manage. These work on slopes and add sound without the upkeep of fish or algae control. Projects like professional outdoor transformations often include water features to increase visual interest and property value.
Build Garden Beds and Landscaping Features
Garden beds break up open lawn and add structure. Raised beds, in particular, improve drainage and keep roots warm earlier in spring.
Build raised beds from 2×10 or 2×12 untreated lumber, composite decking, or galvanized steel. Avoid pressure-treated wood rated for ground contact unless it’s labeled safe for edibles (look for ACQ or CA treatments, not older CCA). Standard bed size is 4×8 feet for easy reach: go narrower (3 feet) if accessed from one side only.
Fill beds with a mix of topsoil, compost, and peat moss or coconut coir in equal parts. A bed 12 inches deep needs about 1 cubic yard of mix per 3 beds. Mulch on top with 2–3 inches of shredded bark or straw to hold moisture.
For in-ground beds, remove sod, till 8–10 inches deep, and amend with compost. Edge beds with steel, stone, or plastic to keep grass from creeping in.
Plant selection depends on your zone, but focus on layering: trees and shrubs as backbones, perennials for seasonal color, and ground covers to fill gaps. Native plants require less water and attract pollinators.
Install drip irrigation if your beds are large or you travel often. A simple system runs off a hose timer with 1/2-inch mainline tubing and 1/4-inch emitter lines spaced 12 inches apart. Delivers water directly to roots and cuts water use by 30–50% compared to sprinklers.
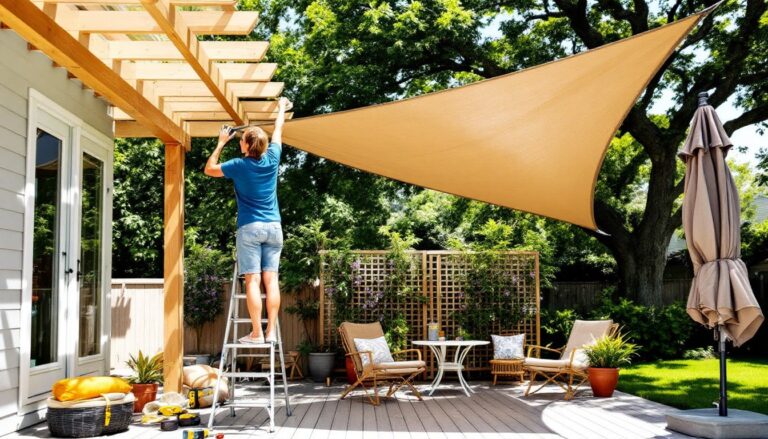
Install Outdoor Structures for Shade and Function
Shade structures extend how much time you can spend outside and protect furniture from UV damage. Choose based on your budget and how permanent you want the setup.
Pergolas provide partial shade and support climbing plants. Build with pressure-treated 4×4 posts sunk 3 feet in concrete (deeper in frost-heave zones). Span beams with 2×8 or 2×10 rafters depending on width: consult span tables to avoid sag. Add lattice panels or shade cloth (30–50% density) for more coverage. Pergolas generally don’t need permits if they’re under 200 square feet and unroofed, but check locally.
Pavilions and gazebos offer full coverage and need more robust framing. Most DIYers buy kits: custom-building requires cutting compound angles and installing a shingled or metal roof, which means flashing, drip edge, and potentially a permit.
Retractable awnings mount to the house and extend 10–12 feet over patios. Manual crank models cost less: motorized versions add convenience. Install backing blocks between siding and sheathing to anchor the mounting brackets into studs or masonry anchors for solid walls.
Sail shades are budget-friendly and DIY-friendly. Anchor corners to posts, trees, or house fascia with stainless steel hardware and tension to prevent flapping. Choose HDPE fabric with UV inhibitors rated for 5+ years.
All structures taller than 8 feet or attached to the house typically need permits and inspections. Plan for footings below frost line to prevent heaving.
Incorporate Pathways and Hardscaping Elements
Paths guide movement, protect grass, and add visual structure. In large yards, they prevent worn dirt trails and make the space feel intentional.
Gravel paths are the easiest DIY. Dig 3–4 inches deep, line with landscape fabric, then fill with 3/4-inch crushed stone for the base and top with pea gravel or 1/4-inch stone. Edge with steel, plastic, or timber to contain the gravel. A 3-foot-wide path handles foot traffic: go 4–5 feet for side-by-side walking or wheelbarrows.
Flagstone or pavers look more finished. Excavate 6 inches, lay 4 inches of compacted gravel base, then 1 inch of sand. Set stones with 1/2-inch joints and sweep polymeric sand into gaps to lock them in place. Wet the sand to activate the binder.
Concrete walkways are permanent and low-maintenance. Pour 4 inches thick over 2–4 inches of gravel, with control joints every 4 feet to manage cracking. Broom-finish for traction. Stamped or stained concrete costs more but mimics stone.
Stepping stone paths work for light-traffic areas. Set stones flush with the lawn so mowers can pass over. Space them 18–24 inches apart for a comfortable stride.
For curved paths, use a garden hose to lay out the route before digging. Curves feel natural: rigid straight lines look institutional unless they’re connecting structures.
Hardscaping extends to retaining walls, edging, and decorative rock. Design ideas from sources like Homedit and The Spruce can help homeowners visualize combinations of materials and textures that suit their yard’s style.
Conclusion
A large backyard is only as useful as the plan behind it. Breaking space into zones, adding hardscaping, and building structures for shade and entertainment turns an overwhelming lot into a series of functional outdoor rooms. Start with one area, paths, a firepit, or a raised bed, and expand as time and budget allow. The best yards aren’t finished overnight: they’re built project by project.